How to Knit a Top-Down Sweater Without a Pattern
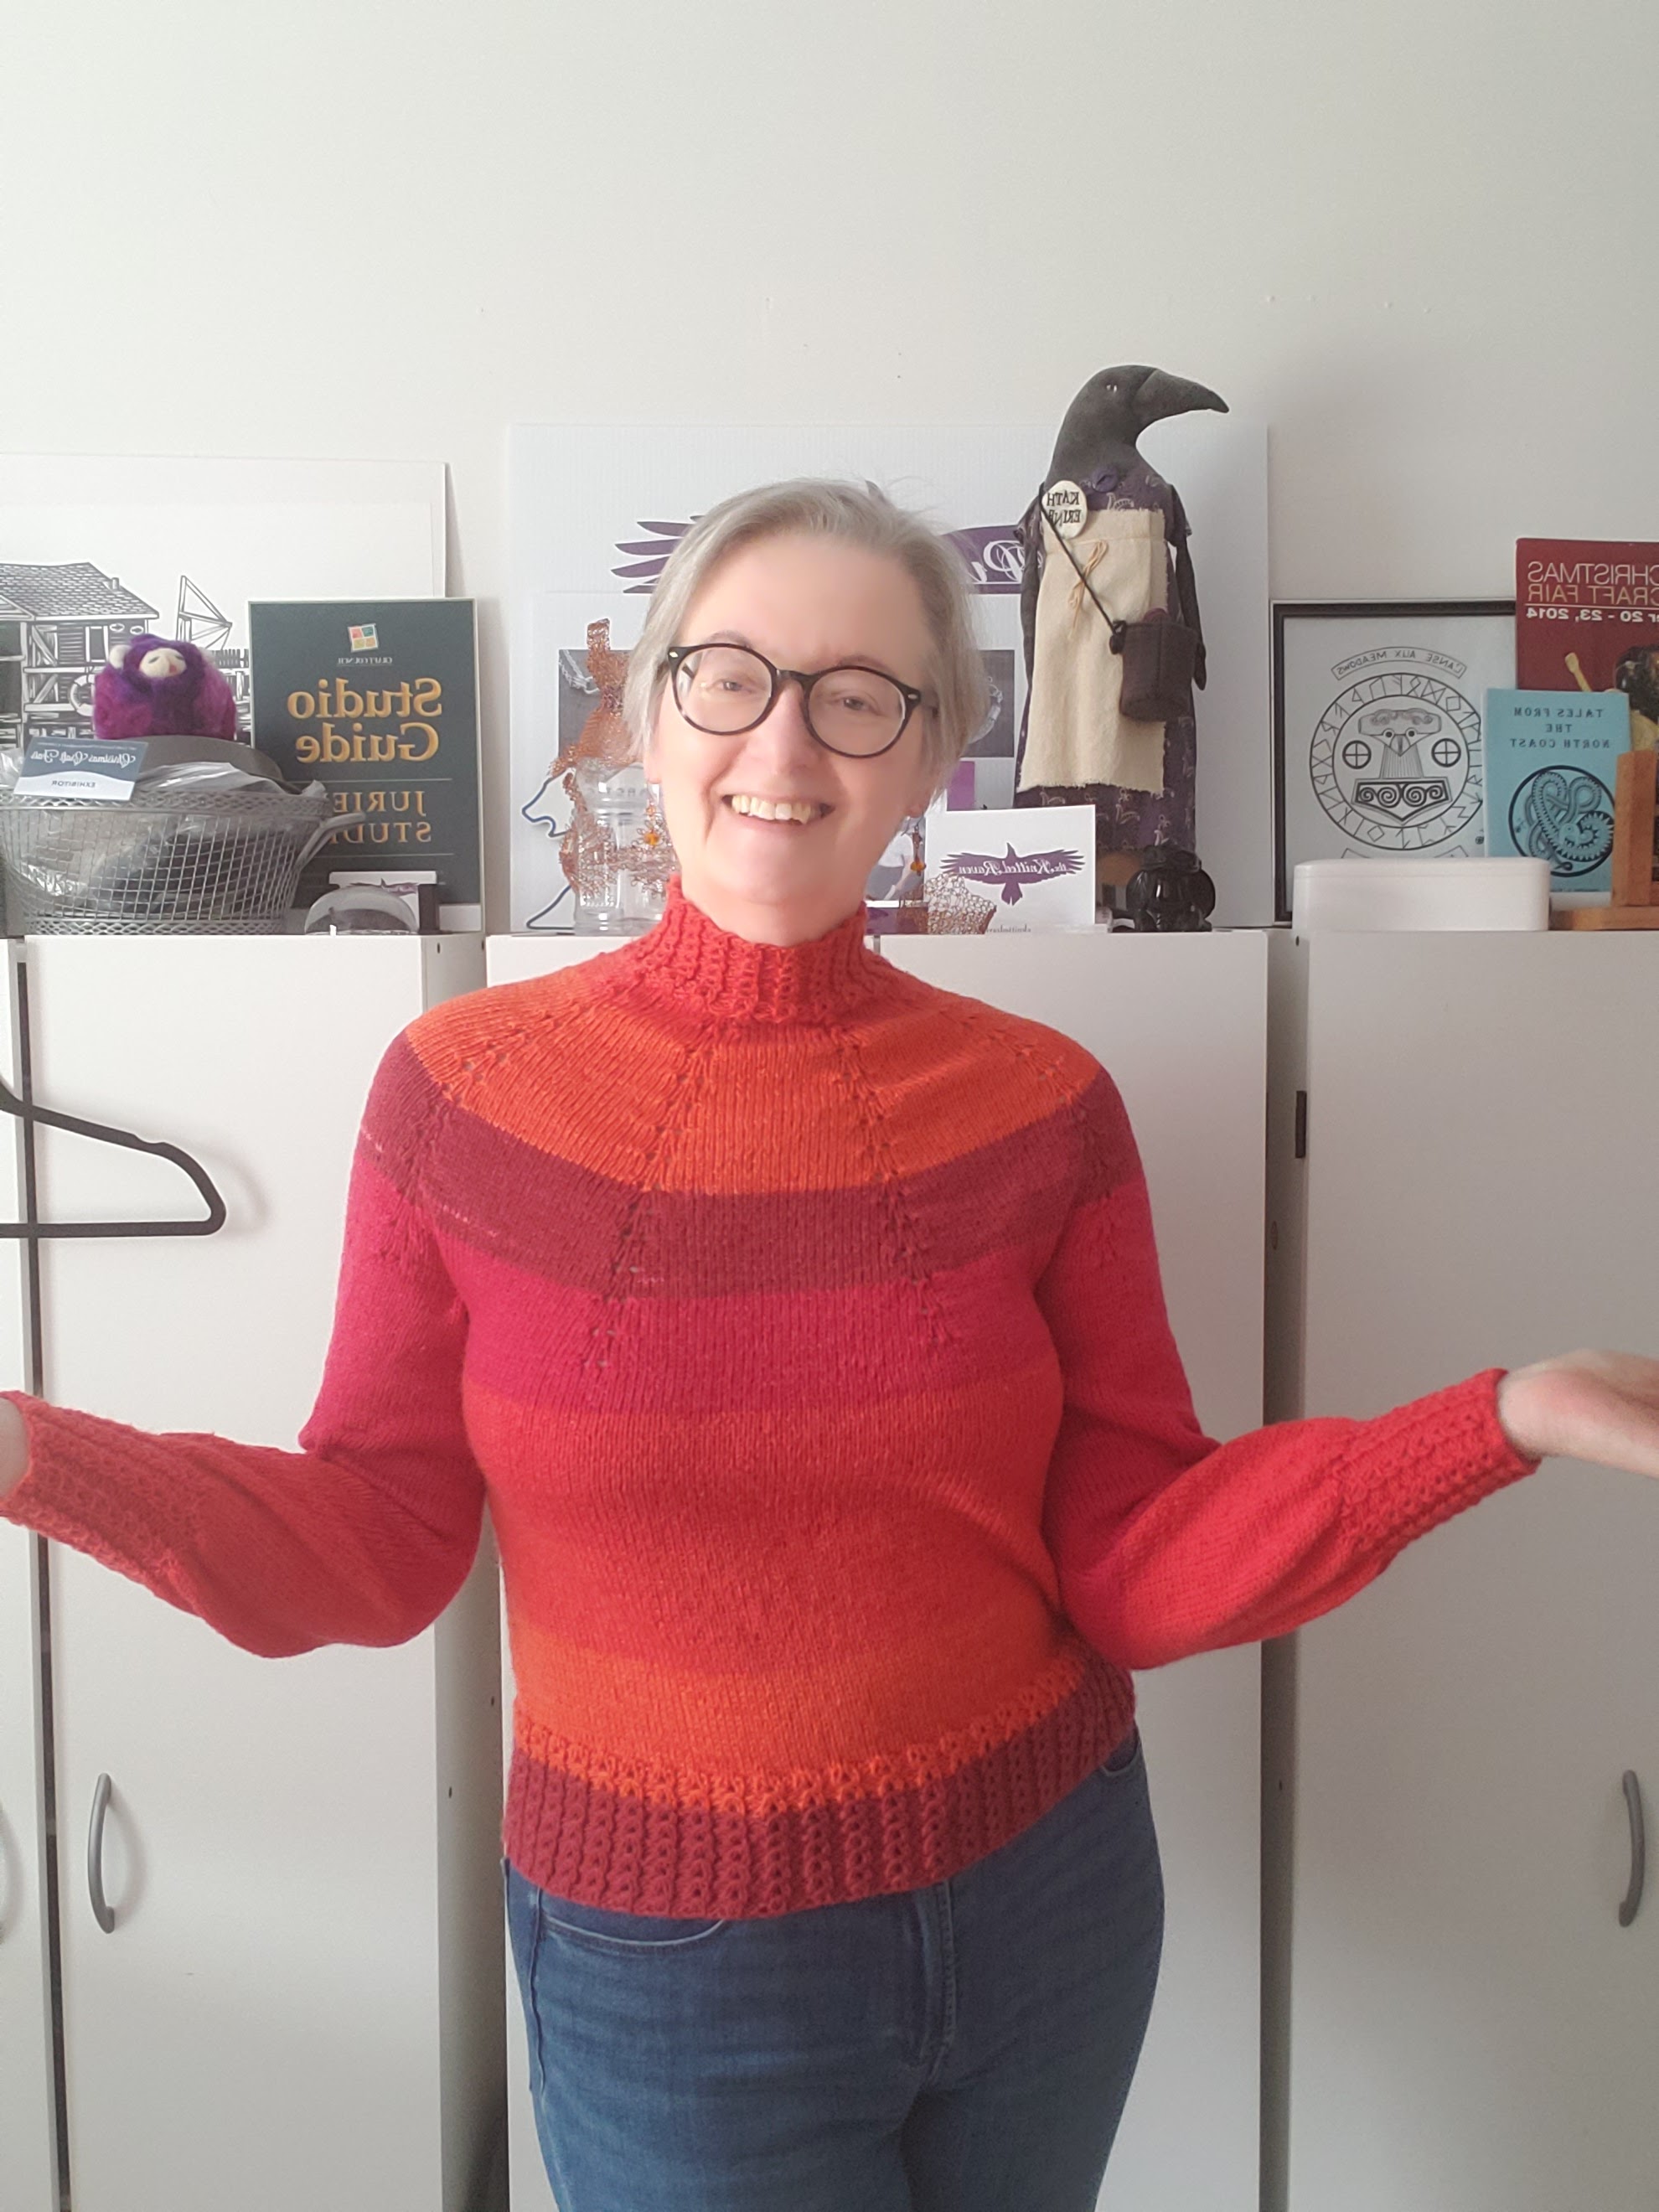
After completing the Knitter's Kozy, I felt I had a much better understanding of how circular yokes work and decided to put it to the test. Using Holly Chayes Shawl Geometry for an Octagon Donut as my guide, I set out to create my own top-down sweater.
I had some Cascade Whirligigs that I'd purchased on sale and thought the DK weight would be a nice choice. I discovered an easy mock cable ribbing over Christmas and decided to put it into use in this project as well at the neckline, cuffs and bottom band.
What follows is how I figured out my sweater pattern. If you use your gauge and body measurements, you should be able to do the same.
Note: my patterns are posted for free without annoying advertising pop-ups. I do this on purpose as some people are intimidated by aggressive advertising, and I want my patterns to be available to everyone. If you are in a position to show a little appreciation for my work, consider buying me a coffee ☕️ using the link on the home page. If you wish to knit items for sale using my patterns, please credit me as the designer and do not underprice your work!
Yarn: Cascade Whirligigs (3), in colorway number 04.
Needles: 3.5 mm double pointed needles and circular needle for collar, cuffs and band; 4.0 mm circular for the body (24-32 inches long)
Other necessities: soft measuring tape, darning needle, scissors, eight stitch markers
Gauge: 21 stitches and 29 rows = 4 inches on 4 mm needles; 5.25 sts and 7.25 rows per inch.
Mock cable pattern (knitting in the round):
Round 1: (k2, p2) to end of round
Round 2: (k1, yo, k1, p2) to end of round
Round 3: (k3, p2) to end of round
Round 4: (sl1, k2, psso, p2) to end of round
Taking your measurements: I decided I wanted a snug fitting turtleneck. If you want a different type of neckline (jewel neck, wider crew neck), try out the measurement using the soft tape measure. Recognizing there will be some stretch to your neck band, calculate the number of stitches to cast on.
5.25 x 15 inches = 78.75 stitches. Given I chose to use smaller needles for the cuff, collar and band, I rounded the stitches up to 80.
You also need to measure your shoulder width, with your arms by your sides, so you'll need help with this. My shoulders were 44 inches. The yoke will need to cover my shoulders and drape down over to form the cap of the sleeves. Since you can try the yoke on as you go, you can keep checking until you get the desired depth.

Collar:
The number of stitches cast on needs to be divisible by 16 in order for the shawl geometry formula to work. So, for example, you are working with either an 80, 96, or 122 stitch cast on. Choose your cast on stitch number based on your gauge, desired neck measurement and the amount of ease you want in your neck line.
Using my 3.5 mm needles, I cast on 80 stitches, joined in the round being careful not to twist my work. Place a stitch marker at the beginning of the round (BOR).
First round: (k2, p2) to the end of the round.
Commence mock cable pattern and do six repeats of the four row pattern.
Next round: (k2, p2) to the end of round.
Switch to 4 mm needles and place markers as follows:
1st increase round: BOR, k1, pm, yo, k9, yo; (pm, k1, pm, yo, k9, yo) repeat to the end of the round. (8 sections) 96 sts on needles. That was your first increase round. Then knit 5 rounds, slipping the markers as you knit.
Note: the number of knit stitches between your yarn-overs will depend on how many you cast on to begin with. I cast on 80 stitches initially, and the yoke will be divided into 8 sections, so there should be a total of 10 knit stitches in each section of my first increase round.
BOR, k1, pm, yo, k9, yo k1 + k9 = 10 knit stitches
pm, k1, pm, yo, k9, yo k1 + k9 = 10 knit stitches
If you started with 96 stitches, you would have 12 stitches in each section, or:
BOR, k1, pm, yo, k11, yo k1 + k11 = 12 knit stitches
pm, k1, pm, yo, k11, yo k1 + k11 = 12 knit stitches
Your subsequent incre4ase rounds will grow accordingly as you are increasing 16 stitches in total each time, or 2 stitches per section.
2nd increase round: BOR, k1, sm, yo, k11, yo; (sm, k1, sm, yo, k11, yo) repeat to the end of the round. (112 stitches). Knit five rounds slipping markers as you go.
Each time you are increasing 16 stitches in the round, two per section). Each increase round is followed by five rounds where no increases are made.
3rd increase round: BOR, k1, sm, yo, k13, yo; (sm, k1, sm, yo, k13, yo) repeat to the end of the round. (128 stitches). Knit five rounds slipping markers as you go.
4th increase round: BOR, k1, sm, yo, k15, yo; (sm, k1, sm, yo, k15, yo) repeat to the end of the round. (144 stitches). Knit five rounds slipping markers as you go.
5th increase round: BOR, k1, sm, yo, k17, yo; (sm, k1, sm, yo, k17, yo) repeat to the end of the round. (160 stitches). Knit five rounds slipping markers as you go.
I continued increasing every sixth round in this manner until I had 304 stitches on my circular needle. Be sure your yoke fits you well! It should cover your shoulders and come down well over your decolletage. If your yoke isn't big enough, you may not have enough stitches to get a comfortable fit.
I calculated how many stitches I'd need for the bust circumference and sleeve circumference using my measurements and gauge information to give me an idea of where I needed to be in terms of stitch count. I strongly suggest you do the same.

Example:
Desired bust measurement: 43 inches needs 225 stitches (I ended up with 220 which gave me a little negative ease). 43 inches x 5.25 stitches per inch = 225.75 Since there was no other shaping to the sweater, I was comfortable with this. I also knew I wanted a stitch number divisible by four for my mock cable pattern, so 220 or 224 were my options.
Desired sleeve circumference: I knew I wanted a comfortable fit in the armpit and elbow areas as I don't like tight sleeves so I opted for a circumference of about 15 inches.
15 inches x 5.25 stitches per inch = 78.75 I bumped this up to 80 stitches as I needed a stitch count divisible by four for my mock cable pattern.
Then I knit one round and then a second round, stopping 10 stitches before my BOR.
Moving the BOR
In order to center the increases evenly before dividing for the sleeves, I needed to shift my BOR back by 10 stitches. The BOR is now at the beginning of the 59 stitches for my left sleeve cap. there are 93 stitches for the back, 59 for the right sleeve and 93 for the front of my sweater. So I slid the left sleeve stitches onto a holder and cast on 17 stitches for the left underarm, knit across the 93 back stitches, slid 59 stitches for the right sleeve onto a holder, cast on another 17 stitches for the right underarm, then knit across the 93 front stitches.

The number of stitches you have when your yoke "fits" will depend on your personal size. I knew I wanted a bust size of about 43 inches, so would need close to 225 stitches. I ended up with 220 for my sweater body. The two lots of 59 stitches on holders for the sleeves would also get an additional 17 stitches or so per side picked up when I went to work on them. I knew based on my gauge that 80 stitches would give me a sleeve circumference of just over 15 inches. I was comfortable with that at the armpit and knew I could shape the sleeve later on.
I will confess that this part took a little time to figure out. I marked the center front and center back with scrap yarn and counted from the centers back to where I thought each sleeve should begin. In order to get things to line up, my BOR had to shift back 10 stitches.
Don't rush this part. Be sure your yoke is centered before you place the sleeve stitches on holders and cast on for the underarms. Once you have that done, your sleeve placement (and therefor your yoke placement) will be fixed.
Sweater body: Now the easy knitting started. I no longer needed any more increases. I knit in plain stocking stitch until I was about 10.5 inches from the armpit. Then I switched to 3.5 mm needles and did one round of (k2,p2) before beginning seven repeats of the mock cable pattern. After my last round 4 of that pattern I did one more round of (k2, p2) ribbing before casting off in ribbing.

Sleeves: Starting at the middle of the armpit (i.e. the 16 stitches cast on), I picked up 11 stitches, knit across the 59 stitches on the holder, then picked up another 10 stitches for a total of 80. Note, if you need to pick up a few extra stitches under the arm to close up any little "holes", do so and then decrease to 80 stitches over the first round or two, being careful to hide these decreases under the sleeve arm.
I knit the sleeve until it reached my lower forearm (try on as you go). I already knew the gauge of my mock cable bands, and decided I would do nine pattern repeats. If you want narrower cuffs, then you will need to continue on in stocking stitch further down your arm. Before I switched to the smaller needles, I had a decrease round where I K2tog to the end of the round (40 stitches). I switched to the smaller needles and began by doing one round in ribbing (k2, p2) to the end.
Then I completed nine mock cable repeats (36 rounds). I did one last round in (k2, p2) before casting off in ribbing.
I repeated this process for the other sleeve.
Tips on working with Cascade Whirligigs
Cascade Whirligigs are good value for the price and even moreso when you get them on sale. It's a good wool blend (60% merino, 20% nylon, 20% acrylic) that should hold up well to wear while keeping you comfortably warm.
My one complaint about them is the long color changes. Top-down sweaters are a good choice for yarns like this as the changes will appear unbroken in the garment, provided you plan for the sleeves! (note - another alternative is to use them in vests of sleeveless garments, but I live in a place where sleeves are a necessity for most of the year, so....)
Once the body was done, I went back to the remaining skeins I had (I had bought 4) and wound off the different colors, to ensure I could start the sleeves with the same color as was in the yoke when those stitches were put onto a holder. The sleeves went from a red to an orangey red, on both sides, in almost the same place. I decided sleeve symmetry was necessary to avoid an awkward color block.
This may require you to have an extra ball, but if it's a weight of yarn that you commonly use, it won't go to waste. And because of the nylon content, this yarn could find it's way into socks, slippers or other hardwearing item, yet it's soft enough to use in a child's toy.
Anyway happy knitting. If you have any questions, drop me an email at theknittedraven@gmail.com
Abbreviations:
BOR - beginning of round
k - knit
p - purl
pm - place marker
psso - pass slip stitch over
sm - slip marker
yo - yarn over
Comments
Post a Comment