Snow Day Slouchy Hat
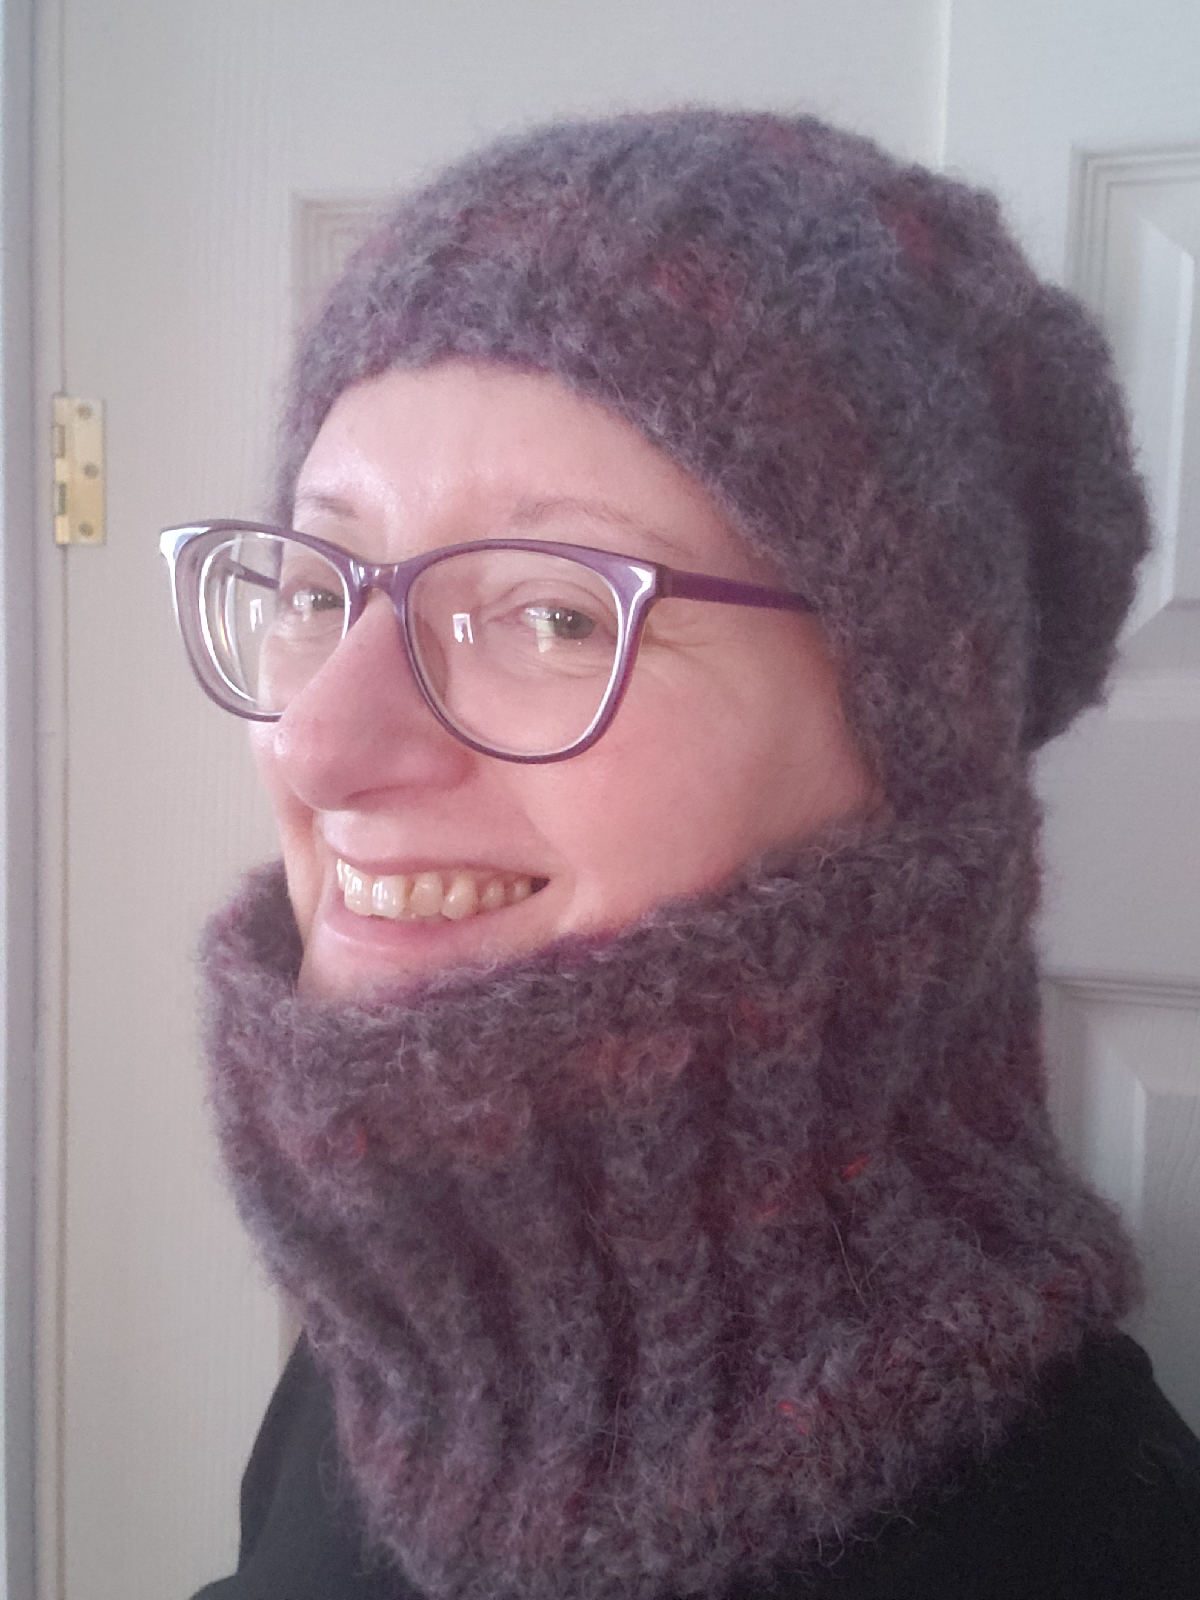
This is part two of my snow days' project: the Snow Day Slouchy Hat.
In the past year, I've knit a number of slouchy hats and my pet peeve is that many lack a proper crown. So instead of a slouchy shape, you end up with what looks like a knitted tongue hanging down the back. I really don't like that look.
So, using the same materials as with the Snow Day Cowl, I made a matching hat to share with you.
Note: my patterns are posted for free without annoying advertising pop-ups. I do this on purpose as some people are intimidated by aggressive advertising, and I want my patterns to be available to everyone. If you are in a position to show a little appreciation for my work, consider buying me a coffee ☕️ using the link on the home page. If you wish to knit items for sale using my patterns, please credit me as the designer and do not underprice your work!
Materials: one ball of Rico Design Fashion Luxury Yarn (alpaca/wool/nylon blend) and one ball of Sugarbush Drizzle (mohair/silk). The Rico lists itself as a super bulky yarn, but I personally think that's a bit of a stretch. If looking to substitute, go with a bulky yarn instead. The Drizzle is a variegated laceweight yarn. The Rico is a matte color so the mohair/silk stands out even though it is much smaller in scale. Keep this in mind when choosing your yarn. Both yarns are held together for the entire project.
Tools: 6 mm circular needle (I used a 16 inch), stitch marker, scissors, tapestry needle, soft tape measure.
Gauge: 3 stitches and 5 rows equal 1 inch in stockinette.
Instructions:
Make a gauge swatch. If your swatch it too big, try a 5.5 mm needle. If your swatch us too small, try a 6,5 mm. It is important to get the gauge right or you won't get the fit you desire.
Using the tape measure, measure the circumference of your head, where the band of your hat will sit. Mine measured 22 inches. To get a comfortably snug fit, I subtracted 10% dropping the measurement to 20 inches. Based on my gauge, the band will require 3 x 20 = 60 stitches.
You can make your hat smaller or larger by using the gauge x desired size. Just remember to make your stitch count divisible by 4 so your ribbing pattern works.
Cast On: Using your preferred cast on method, cast on your desired number of stitches (in my case 60 stitches). I used a cable cast on as I like the edge it gives me. Be sure not to cast on too tight. You want your band to stretch as you reduced the size by 10%.
Join in the round ensuring not to twist your knitting. Begin (k2, p2) ribbing, repeat to the EOR. If you haven't placed your marker already, do so now.
Continue ribbing for 24 rounds.
Next round: (k2, p1, yo, p1), repeat to EOR. (Increase 15 sts in my case - one stitch between each pair of purl stitches. If you have more or fewer pairs, your total increase will differ)
Next round: (k1, yo, k1, p3), repeat to EOR.
Next round: (k3, p3), repeat to EOR.
Next round: (sl1, k2, psso, p3), repeat to EOR.

Commence Barnacle Stitch Pattern (next 4 rounds constitutes one pattern repeat)
Round 1: (k2, p3), repeat to EOR.
Round 2: (k1, yo, k1, p3), repeat to EOR.
Round 3: (k3, p3), repeat to EOR.
Round 4: (sl1, k2, psso, p3), repeat to EOR.
Repeat Barnacle Stitch Pattern four more times (i.e. 16 more round).
Next round: (k2, p2tog, p1), repeat to EOR.
Next round: (k1, yo, k1, p2), repeat to EOR.
Next round: (k3, p2), repeat to EOR.
Next round: (sl1, k2, psso, p2), repeat to EOR.
Next round: (k2, p2tog), repeat to EOR.
Next round: (k1, yo, k1, p1), repeat to EOR.
Next round: (k3, p1), repeat to EOR.
Next round: (sl1, k2, psso, p1), repeat to EOR.
Next round: (k2, p1), repeat to EOR.
Next round: (k1, k2tog), repeat to EOR.
Next round: (knit to EOR).
Next round: (K2tog), repeat to EOR.
Next round: (knit to EOR).
Next round: (K2tog, k1, k2tog), repeat to end of round.
Cut yarn leaving a 7-8 inch tail. Thread through tapestry needle. Draw yarn through remaining stitches, pulling to draw the gap closed. Secure the ends.
I took a 2mm crochet hook and made a chain using the Drizzle yarn, long enough yo go around the band three times with length to spare. I threaded it through the yo holes just above the ribbed band taking care not to draw the band together. Remember, your band needs to accommodate your head! But the colors were a nice accent.

Enjoy your hat!
Abbreviations
EOR - end of round
K - knit
P - purl
K2tog - knit the next two stitches together
P2tog - purl the next two stitches together
yo - yarn over
Sl1 - slip one knit-wise
Psso - pass slipped stitch over the two stitches just knitted
CO - cast on, cast off

Comments
Post a Comment