Making a Pattern Your Own
Using a premade pattern for knitting is what most knitters do when they first get into the craft. I've been knitting for many years and still enjoy making things designed by others, even though I also make patterns of my own.
Sometimes, I want to try another designer's pattern to learn a new technique, or to make a garment I've never tried to create before. 2023 was the year I learned how to read a knitting chart and to knit top down sweaters and purchased patterns got me started on both of these.
When I'm learning a new technique, I will often follow a pattern to the letter as my entire focus is on the new technique. The second time around, I will likely veer off into the land of creativity to put my own mark on my creation.
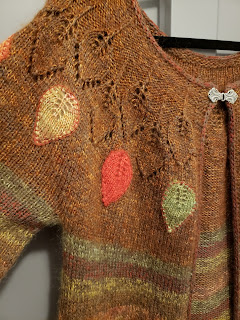
Such is the case with the Helmi Pattern by Mari Muinonen (see picture on the right) available for free on Ravelry. I wanted an open-front cardi/vest and this looked like just the thing. It was also an opportunity to practice reading a chart and to become a bit of stash buster.I had some Estelle Eco Andean yarn in Milk Chocolate that I bought on sale from Artisanthropy online. Brown is never my first choice, but I thought I might be able to add strands of laceweight yarn from my stash (leftovers largely), make it more colorful. I have called this sort of color blending as mixology for knitters. It is a wonderful way to customize a pattern and make a truly personal and unique garment.
I also opted to add a bit to the neck as I didn't want quite as wide a neckline. I did this by adding a few rows of garter stitch, to blend in with the pattern.
Sometimes I struggle with gauge and while I made gauge with my swatch, by the time I got to the end of the yoke chart, things were looking a little tight. I ended up switching to a 4.5mm needle to compensate. This made my cardi/vest a little snugger through the shoulders. What this means is my open front cardigan is a little more open, but I decided that was okay as I really didn't want to FROG it.
I maintained the same carry-along laceweight through the entire yoke, but once I got to the separation of body and sleeves, started changing colors every six rows. I ended up with a five color repeating stripe pattern. I ended with a wide band of garter stitch as the pattern called for carrying the same green as at the beginning of this section. I repeated the first five color changes in the short sleeves to coordinate with the body.I didn't want to make my sleeves longer by adding another garter stitch band so I opted for an I-cord cast off. This was the first time trying this type of cast off and I loved it! Then I decided to add an I-cord edging to the entire piece. It finished everything off wonderfully.
After the knitting was done, I decided to add some embellishment. I'd made knitted leaves last year for a different project, but then didn't use them. I thought they would be perfect for this one. I used the same laceweight yarn I'd used in the I-cord to blanket stitch the leaves onto my project. I dug an old pewter clasp out of my recyclable jar and attached it to the I-cord edging at the neck.
While I could declare the project as done, I'm thinking about adding some additional embroidery to it. The garment has a lovely whimsical vibe to it and would be entirely at home in the Shire! I'm including pictures of it before embroidery as I'm still thinking about that.
So, as you can see, even if you'd rather use pre-made patterns for your knitting projects, there are ways to personalize your project:
1. Color blending/mixology for knitters - this is a lovely use for leftover laceweight yarns. Just be sure to swatch while carrying both yarns together.
2. Using a different edge treatment - you can do a different sort of ribbing, use I-cord edging, etc.
3. Embellishments afterwards - there are lots of tutorial videos out there on knitting (or crocheting) shapes such as flowers, leaves, etc. Made in colors to coordinate with your project, this can be a great way to burn through your yarn scrap stash.
4. If you are adventurous and don't mind swatching, you can even choose a different stitch pattern. Just be sure to swatch to ensure the gauge is compatible and the drape is similar to what the pattern calls for. You will need to commit to multiple swatches (at least of the original stitch pattern and the one you want to use).
As many patterns as there are available to knitters, the resulting garments can be as varied as the knitters themselves. Don't be afraid to put your personal stamp on a project. You just might be thrilled with the results.
Happy Knitting!


Comments
Post a Comment